Flexible Seating Classroom Reveal


In my last blog post, I talked about how I completely changed my traditional classroom to a flexible seating classroom on a BUDGET.  If you are just starting, you will want to read it here.


Today, I have my classroom reveal to share with you.  I hope you are as excited as I am!  

My 4th grade classroom is 25' x 27'.   This is the smallest classroom I have ever taught in, yet I think it looks and feels the most spacious!  

I have 26 students and 29 actual seating options, as well as other options.  (That's hard to believe from this picture, right?)  I'll count them for you as we go along.


Here is the view from my door.  I built upon the bright pink, green, blue, purple, orange, and yellow I already had in my classroom.
These are standard pillows with bright pink pillowcases for low seating (seats #1-4).  
This is looking from the front of the room to the back. You can see my classroom library, which extends behind my door. 
Here is a closer look at the black leather gaming chair next to my classroom library (seat #5).
I found these bright stools just a couple of days before school started and added them to my computer area. 
These stools are not part of the daily flex options.
This is looking from our meeting rug to the back of the room.  These are the cubbies where my students keep their supplies.
My teacher stuff is located behind my small group table.  I got rid of my teacher desk four years ago when I moved to this smaller room.  I have a small desk for my computer.  I have three pink and green stools for flex seating.  These are very sturdy and have storage inside.  I found these on an online yard sale during pre-planning  (seats #6-8). (SCORE!!)  
This purple basket was given to me.  It is perfect for our pillows to use for "extra" flex seating.  Students can choose this option along with blankets or towels.  I have used these for many years.

I brought two of my camping chairs from home and a small table I purchased from a friend.  I have had the lamp for several years in my classroom.  The fuzzy purple picture frame was one my daughter left when she got married and moved out.  I will take a class picture and add it.  Two clipboards in a basket I already had finishes off this cozy little area for two (seats #9-10).

This is looking from the front corner of my rug to the back of the room.  I purchased this plastic treasure chest a few years ago at Walmart.  It contains our blankets and towels for extra flex seating.

My principal is extremely supportive and as excited about this change as I am.  She purchased these two wiggle stools from Amazon for me.  They work great with this small table I already had in my classroom (seats #11-12).

I was super excited to find this great leather loveseat!  I added two pillows from home and this rug that was rolled up in my closet for another cozy seating area (seats #13-14).
These two comfy chairs finish out the living room corner.  The table was another leftover from my daughter, and the lamp was one previously in my room (seats #15-16).

The inspirational posters that can be seen all over the room can be found here in my TPT store.  There are 100 in the pack.  I also hang a different one outside my door each morning.  Other students stop to read them and thank me for posting.
This is the front corner of my meeting rug.  I have had this rocker for about ten years.  I also already had the lamp, bookshelf, and floor pillows.  The scoop rockers can be seen next to the bookshelf.  Desk trays can be used by students who want to sit on one of the floor pillows as extra flex.  I purchased the beanbag chair from Amazon  (seat #17).

Here is a closer view of items students can grab and go.  Our science, social studies, and language arts textbooks are also on the shelf to pull out as needed.
These scoop chairs are a big favorite and are super cheap at Walmart (seats #18-19)!
 Desk trays from Hobby Lobby are used with
these large floor cushions my mom sewed several years ago for extra flex seating.
This it the view from the back corner of my room.  Having the rug in the middle of the room really helps give the illusion that my room is super spacious...when it really isn't.
My principal purchased two stability balls that will go here.  Unfortunately, they are on back order for about another month.  These crates and chair cushions were at my house and became emergency plan B.  I just turned the crates upside down and tied the cushions on them.  They are working out so well that I will move them to the small-group table with the green and pink cubes when they are no longer needed here. That will also increase to 31 seating options (seats #20-21)!
Another great castoff from my daughter was this lamp. It provides much needed light in this back corner.  During the school day, my overhead fluorescent lights are usually off, and we only use lamps and natural lights from the window.  The book shelf is on wheels, so it is easily moved when I need in the closet.  This bungee chair was a great yard sale find and is a favorite of my students (seat #22).

This gaming chair found a nook under the backpacks.  During the day, it can easily be scooted out just a bit from the wall.  Don't be afraid to use every available space in your classroom! Students are loving this cozy nook to work independently (seat #23).
Here is the ONLY traditional table and chairs in my classroom.  I really felt that I needed to keep one of my six tables, but the kiddos complain if it is their turn to sit here. Who can really blame them with all of these other great options (seats #24-27)?


Looking from the computer table, here is another view of my classroom.
The last two flex seating options have also been favorites.  I had a friend who was taking these two stools to the recycle store and gave them to me for FREE (whoo-hoo!!)!  I placed these at each end of the cubbies, and the taller height works perfectly.  They also swivel, allowing students who need that extra movement to have it (seats #28-29).
Pulling the cubbies away from the wall allows students an extra option of flexibility.  Students who need to stand can do so here.


Each student has a book bin for his or her reading book, workbook, and notebook.  


Here is one last view.  I am absolutely LOVING my new flexible seating classroom!  I look forward to hearing from you with your thoughts and/or questions about flexible seating.

Want to read more?

My Journey Into Flexible Seating - Making the Leap


 What Is Flexible Seating? 

     To answer this question, think about your home.  Do you have only one seat you sit on each time you sit down?  No, you sit on the couch or comfy chair to watch television, read, and more.  You sit at the table to eat.  You sit on an office chair when sitting at your desk.  You might even sit on your bed or use a pillow for sitting on the floor.
     Flexible seating in the classroom strives to do the same.  Teachers dread professional development (for more reasons than one), but sitting on a hard chair for even just a small amount of time is at the top of the list.  Now, stop and think about how much you dread those chairs.  Think about how tired your back and other body parts feel after sitting on those chairs.  Think about if you had to sit on that same chair every day all day long.  You would be twisting and turning also.
     Flexible seating offers different types of seating in your classroom for your students far beyond the hard plastic chair.   Multiple types of seating are available in the classroom.  How to implement that seating is up to each individual teacher.  

Deciding to Make the Leap

     I had wanted to go to flexible seating for several years, although I didn't even realize there was an actual name for it.  First, I didn't do it because I moved from 2nd grade to 4th grade a few years ago.  Then, I didn't do it because we were departmentalized, and I wasn't sure how to make it work with so many students coming in and out of my room.  At the end of this past year, we found out that we would go back to having our homeroom students all day.  I was so excited.  The time felt right to finally do this.
      

How Do I Obtain Seating Options? 

     The great news is that it does not have to be expensive to change the seating in your classroom.  The main thing to remember is that it is still YOUR classroom.  Changing it up as much or as little as you want is entirely up to you and doesn’t have to break the bank.  In fact, it doesn’t even have to cost you a penny.
     Look at your classroom with a critical eye.  What would you like to keep?  What would you like to get rid of?  I had wanted to get rid of most of my tables/desks for several years before I did.  A few years ago, I began by bringing a LOT of comfy pillows into the classroom, as well as bath towels, beach towels, blankets, and clipboards.  For years, I allowed my students to grab clipboards and get comfy anywhere they wanted on the floor...as long as they did their work.

#1 - What's in my classroom? 

     The first thing I did was make a list of all of the furniture options in my room.  I decided I wanted to change my entire classroom.  I already had a large rug on one side of my room.  I had six large tables with twenty-four chairs.  I decided to keep only one table and four chairs for traditional seating.  I also had two standing lamps and four table lamps.
     I had two small tables that would work well for only two students sitting together.  For one of these tables, I wanted to add wiggle stools, but when I saw the price, I knew I couldn’t justify that cost.  I quickly emailed my principal to let her know what I was planning for my classroom and asked if she had it in her budget to order two of these stools for me. She agreed to purchase two.  She also agreed to purchase two stability balls for the other table.  

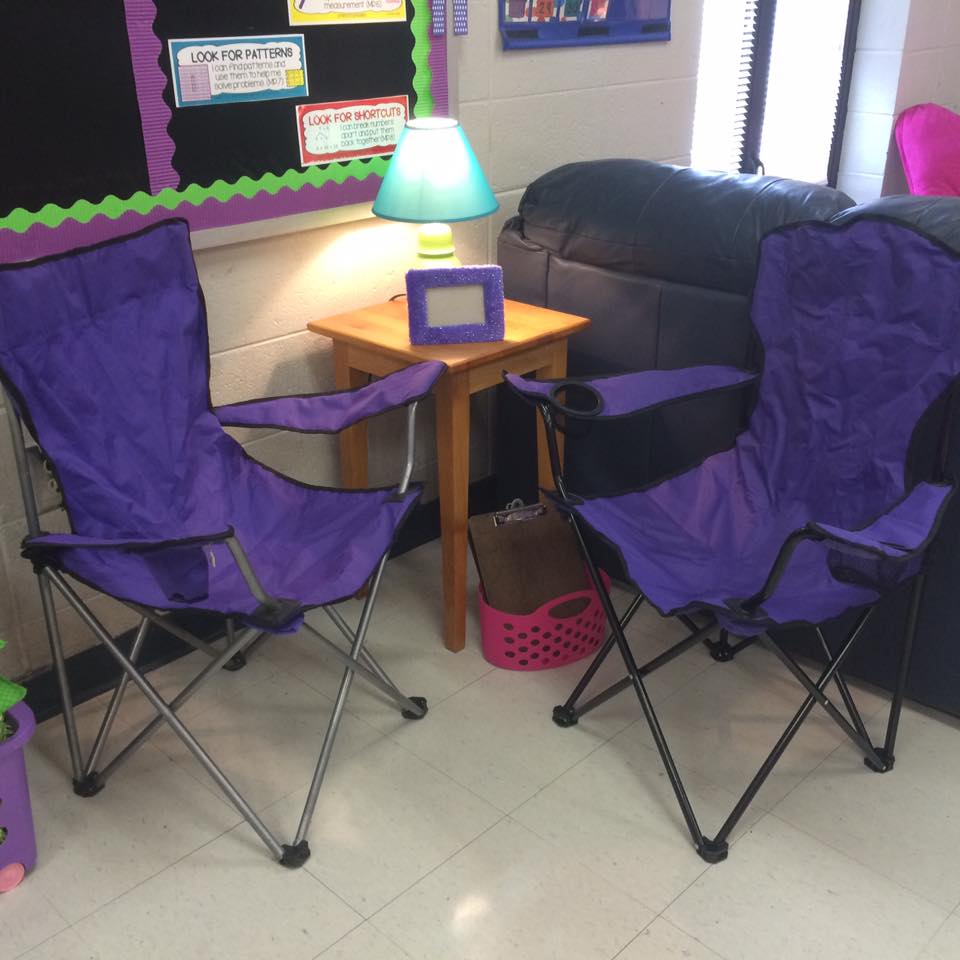
# 2 - What's in my home?

    I started looking for more seating options.  I looked around my house and found two small rugs, a couple of pillows, a lamp, a small table, and two camping chairs that would work.  It's amazing what you can discover that you already have when you are looking with a critical eye.

#3 - What do I need to purchase? 

     Online yard sales through Facebook are the BEST idea someone has ever thought of.  I am a member of several, so I diligently checked them daily and found several items.  Each person sold them to me for even less after finding out that I wanted them for my classroom.

    Also, check out your local thrift and consignment stores.  I got this $60 leather couch for $40.

  #4 - Ask your family and friends.

    Ask your friends and family members if they have any items they will give you or sell for cheap!  I had a friend who was taking bar stools to the thrift store, so she gave those to me for free.  I had a couple more friends who sold me some furniture super cheap!

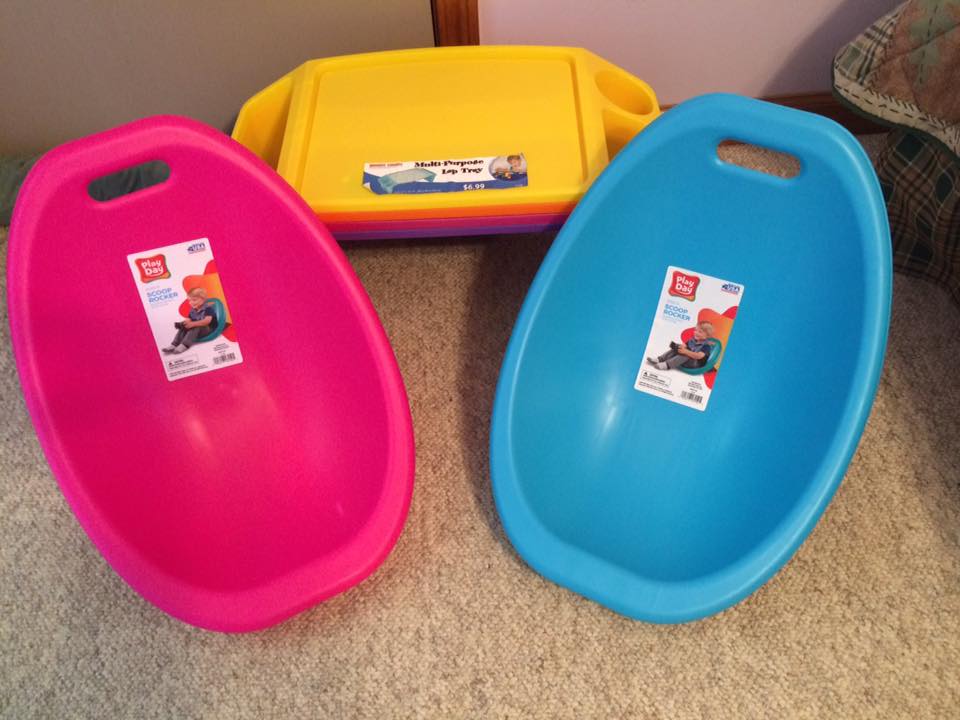
#5 - Purchase any odds and ends to complete your room.

    I bought these scoop rockers from Walmart and four desk trays from Hobby Lobby.  This gave some students a different option from clipboards. 
    I really wanted a beanbag chair. DANG, they are expensiveI found one on sale during Amazon’s Prime Day.  Normally $42, it was on sale for $26.  It was just what I wanted, so I made the splurge.


#6 - Finance your room.

    Consider having a yard sale or selling some items you no longer need online.  I sold several items that helped pay for the items for my classroom.  Plus, it helped declutter my house.

    There's still time to make the change before the new school year.  I encourage you to make the leap if you have been considering this type of classroom.  

    Would you like to see my classroom reveal?  Click here to see all of the pictures!

Sign up for my weekly emails and receive these NO PREP Math and Literacy Centers for FREE!


The Importance of Using Daily Math Spirals


My students had a problem in math.  It seemed that once a unit was over, they mostly “forgot” the things they had learned.  It seemed to be a case of out of sight, out of mind.  To remedy this, I started doing a math spiral many years ago.  Before I had a projector system, I kept everything in a notebook and wrote it on the board each day.  Once I had a projector system and learned how to make my own products, I put the spiral into a more appealing format for my students to use daily.  I tried to incorporate most of the main concepts for 2nd grade.


I wanted to be confident that my students were being exposed to all of the standards throughout the year.

The Standards That Are Covered Each Day

  • Operations and Algebraic Thinking
  • Numbers and Operations in Base-Ten
  • Number and Operations - Fractions (not included in 2nd)
  • Measurement and Data
  • Geometry

I also wanted it to be easy for me so that I wasn't having to constantly search for worksheets and materials that needed to be copied, prepared, and graded for my students every day.

I knew that having a PowerPoint presentation that could be projected would be the easiest and simplest way to make sure that my students were getting what they needed while keeping things easy breezy for me!


This daily spiral became a HUGE part of our daily math routine and such an important part of our daily learning.  My test scores soared! 

When to Use Daily Math Spirals

I have actually used these spirals at different times in my day based upon the schedule and what worked best for that year.  Some times in your day when you might want to consider using the daily math spiral is:
  • morning bell work/arrival time
  • math warm-up
  • one question each day as a "ticket out-the-door"
Since there are only five questions each day, the time it takes for students to complete them does not take long.

Answer pages are included to go over the work after completing.

Students can complete on a write-wipe board, on paper, or in a spiral notebook. Before the "BIG" test in the spring, the spirals can be sent home to use as a study guide.


Second grade has so many standards to cover that there are enough concepts to include for August through May.

However, third grade and fourth grades are a little different.

All standards have been covered and reviewed a minimum of two times by April, so the third grade version ends with April.

In fourth grade, all standards have been covered and reviewed a minimum of two times by March, so the fourth grade version ends with March.  

Using these paperless and projectable math spirals helped increase scores significantly.  

At the Beginning of the Year


At the beginning of the year, we begin with place value (the second question each day).  I tell the students that all of the others are “previews” of what we will be learning during the year.  We work through the problems together.  

However, we only focus on one standard for each of the five big headings each month.  After several days, the students start getting the hang of what the standard is asking of them.  When we cover that standard in our core later in the year, the students have already been exposed to the vocabulary and the concept.  By “frontloading” it into their brains earlier in the year, teaching it is a breeze!


Would you like to see more?  Check out the previews of the products in my store.  You can purchase either each month individually or the entire year.

Click below to see more.


Back-to-School No-Prep Math Centers FREEBIE

Tomorrow makes day #10 with students.  Can you believe it??

I must say that it has been an AWESOME beginning to the school year.  My students are already back in the routine of things, pretesting is behind us, and we already have centers going...

SCREECH!!!  PUT THE BRAKES ON!!!!

Yes, you heard me; centers are already going smoothly.  This is in big part to my NO PREP math centers.  

You can find 10 NO-PREP centers for each grade level.


I even made a sampler packet so that you can try one from each grade level for FREE!

Simply print the instructions on colored copy paper, and hang it up in the center.  Students can read the directions to find out exactly what to do.


Print the cards on white or bright copy paper.  Cut out and tape around the room.  All cutting is straight lines to make the prep work fast and easy.  I always have a couple of very helpful students who do the cutting for me.

Students go on a back-to-school treasure hunt to find the questions and solve them.  

Print the directions for each center and cards on different colors of copy paper to make them stand out and be more appealing.  Of course, you can always just print on white copy paper.

Students can work individually, with partners, or in small groups to order the three-digit numbers on the lunch bags in order from the greatest number to the least number.

They then write the numbers on their individual response sheets in order by following the arrows.

 The sample 4th grade center has students looking for the 0 in the different place values while coloring the space to match the key. 

Making the beginning of the school year easy is just...


My Kind of Teaching